Hi! This section contains things that don't really fit into other categories. I would love to receive suggestions for topics we can explore.
DEBONING CHICKEN BREASTS: I tried to make a video to show how easy it is to debone chicken breasts. There is always a debate between those who feel bone-in breasts are not as inexpensive as they sound because you are paying for bone. There is truth to that but we're going to use the bones to make chicken stock so that will be one ingredient which is practically free.
EFFECTIVE JANUARY 13, 2017, MY 'CONTRACT' WITH WEEBLY WILL EXPIRE AND THE PRO FEATURES WILL NO LONGER BE AVAILABLE. THIS PROBABLY INCLUDES THE VIDEOS BELOW: (1) HOW TO DEBONE CHICKEN BREASTS AND (2) CUTTING A CHICKEN INTO PIECES. IF THAT HAPPENS AND YOU WOULD LIKE TO ACCESS THE INFORMATION, JUST GO TO YOUTUBE AND THERE ARE SEVERAL GOOD VIDEOS THAT WILL ASSIST YOU.
CHICKEN STOCK
Remember the bones we saved in the freezer after we de-boned the chicken breasts? It's time to make stock with them. I also have the carcasses of 2 birds I cut up for parts (doesn't that make me sound awful?). Using my absolute largest pot, I browned the bones and all the little bits, fat and all, being patient, doing a few at a time and getting a nice lot of brown bits on the bottom of the pot. Once each batch was browned, I moved it to a bowl and proceeded with the next few pieces. When they were all done, I put in two peeled onions, roughly chopped, a couple of washed carrots cut in half and a couple of stalks of celery in big chunks. Not a lot of finesse required here! They browned a little in the fat that had been rendered from the carcasses and then all of the bones, bits and all, went back into the pot. It took 22 cups of water to cover the bones. Because I wasn't making this for a particular recipe, I didn't want to flavor it with anything more than a little salt and pepper. Some people add bay leaves, thyme, etc. but I wanted mine to be more generic.
It took several minutes to bring the water to a boil then I turned the heat right down until the water was BARELY bubbling, with the lid askew to let the steam escape. Then, I just let it go - for 5 1/2 to 6 hours - stirring every once in a while. I turned off the heat and let it cool, for an additional couple of hours after which I strained it into a large bowl and let it continue to cool until I was going to bed, covered it and put it in the fridge.
In the morning, all the fat had risen to the top and formed a layer that was easy to remove. The stock was the consistency of partially set Jello (from the collagen extracted from the bones). I ladled it into medium freezer bags - 2 cups per bag - and labelled it with the contents and the date. My 22 cups of water was now 14-15 cups of delicious stock. Since the bones would otherwise have gone into the garbage and their cost was included in the recipe for which they were purchased, the total cost was $.38 for onions, $.34 for 2 carrots, $.28 for 2 stalks of celery. $.96. For the equivalent at the $2 sale price for Campbell's, the price would have been $6-$8. Not bad. I froze them flat so they would stack in the freezer.
In the morning, all the fat had risen to the top and formed a layer that was easy to remove. The stock was the consistency of partially set Jello (from the collagen extracted from the bones). I ladled it into medium freezer bags - 2 cups per bag - and labelled it with the contents and the date. My 22 cups of water was now 14-15 cups of delicious stock. Since the bones would otherwise have gone into the garbage and their cost was included in the recipe for which they were purchased, the total cost was $.38 for onions, $.34 for 2 carrots, $.28 for 2 stalks of celery. $.96. For the equivalent at the $2 sale price for Campbell's, the price would have been $6-$8. Not bad. I froze them flat so they would stack in the freezer.
Someone I know said she makes her stock by roasting the bones and vegetables in the oven in the evening at a fairly high heat. Then, when the pan has its brown bits, she adds the water and turns the heat down so it's barely bubbling, goes to bed and leaves it on all night. In the morning it's ready to start the cooling process. I like the fact that the oven is running at the lowest cost time in our wonderful (we really do need a sarcasm font) time-of-use billing but I'm not sure I'd be able to sleep knowing the oven was on. Still it's something to consider. I've read that chefs leave their stock simmering all night on the stove so it's ready for the next day's menu.
VEGETABLE BROTH
I've made broth before but I was just winging it. For this website, I wanted to make sure I did it right so this is a relatively new task for me. I read Leanne's "Good and Cheap" and researched several cookbooks and websites for advice and instructions. This is what I found and these are the instructions I followed:
1. Always wash your vegetables - even potatoes, etc. that your are going to peel. You only want clean vegetable bits in your broth.
2. To save money, rather than use new vegetables, save carrot ends, mushroom stems, asparagus butt ends, potato peelings, onions with skin, whatever you have in a bag in the freezer. If you have any frozen vegetables that might have picked up freezer burn, add them to your broth bag.
3. Several sites recommended against using cruciferous vegetables (i.e., broccoli, Brussels sprouts, cauliflower, cabbage), artichokes, rutabaga, turnip, corn (which can make the stock cloudy), or the outer leaves of celery (inner ones are fine). Most of these "problem" vegetables can make the stock bitter, especially Brussels sprouts. However, in my vegetable bag I had the centre core from a cauliflower and the thick stalks from a broccoli and I threw them in anyway because other sites only recommended avoiding the sprouts. My son and his family are vegetarian and he said he always uses broccoli and cauliflower without issues.
4. Cut the thawed (or at least partly thawed) vegetables into small pieces to increase the surface area in contact with the water.
5. Just as the amazing rich colour and flavor of the chicken stock came from patiently browning the bones, roasting or sauteeing the vegetables does the same for vegetable stock.
6. Cover the vegetables with COLD water because different vegetables release their flavour at different temperatures so, by starting with cold water, all the vegetables will reach their optimal temperature at some time during the process. My pot took about 12 cups of water.
7. Bring to a boil and reduce the heat to BARELY bubbling. Leave the lid askew and simmer for about 1 hour. Some sites said not to stir it because it would make the veggies go mushy but I couldn't leave it alone and I wanted to make sure I scraped up all of the brown bits.
8. If you wish to season the stock, don't use powdered spices which will form sediment. Use spices and herbs like dried thyme, rosemary, etc. Taste what you have made first, then decide.
9. Cool and strain through a thin kitchen towel or coffee filter.
10. Bag and freeze it if you aren't going to use it within 3 or 4 days. OR (and this is cool) freeze it in ice cube trays then bag them. Eight cubes of frozen stock equals 1 cup.
My 12 cups of water became 7 cups of truly free vegetable stock. I used some last weekend when I made risotto for my vegetarians and it was delicious.
CUTTING UP A WHOLE CHICKEN FOR PARTS
Very often whole chickens sell for less than you would pay for the parts already cut up. Since, of course, we make our own chicken stock there is no waste and it takes less than 5 minutes to cut a chicken into two legs (or two drumsticks and two thighs), two wings and two breasts. I broke the video into segments for ease of uploading and finally, here they are!
Very often whole chickens sell for less than you would pay for the parts already cut up. Since, of course, we make our own chicken stock there is no waste and it takes less than 5 minutes to cut a chicken into two legs (or two drumsticks and two thighs), two wings and two breasts. I broke the video into segments for ease of uploading and finally, here they are!
GROCERY SHOPPING
A family's budget can be broken down to several categories but the three at the top will always be housing (rent/mortgage), utilities, and food. When we are the money managers for our family finances, it's up to us to put in the work and do it right.
You see them every week in the grocery stores - people cruising the aisles with no list, no plan for the week. Or, the ones with a scrap of paper with 3 or 4 items noted down. You can't save money without a plan! Knowing what you're going to eat, when you're going to eat it and what you have to do to make the dish is, I think, the secret to managing the food budget. I'm not saying this is the only or the best way to make a grocery list, just that this is how I've been doing it for 41 years. I'm offering it as a suggestion because I can tell you it works and it takes about an hour per week. That doesn't mean the menu plan is written in stone. When events change, the meals can be shifted around as required. The good part is that you'll know you have the ingredients in house to make the meals you list.
1. Know your prices. On your next trip to the store, write down the regular prices of the things you normally buy. This is called making a grocery book. If you don't know what things usually cost, how will you know if something is a good price when you see it advertised. Just because a flyer SAYS it's a good deal, doesn't mean it is!
2. If you want to try my grocery list method, start with a piece of binder-sized paper, not the back of an envelope. I actually use a coil bound notebook that I buy when the school supplies go on sale for the fall and it lasts me a year. In the bottom right hand corner of the page, list each day for which you are shopping, leaving enough room on the right for 3 columns - breakfast, lunch, dinner. To the left of the list of days, jot down any special things that are happening on those days, swimming lessons, someone not home for dinner, someone working late, guests, etc.
3. Check the grocery ads - all of them - starting with the one where you will do most of your shopping. For me, that's the Superstore ad; for you that might be Metro or Freshco or Food Basics, etc.
4. Down the left margin of the full page write down the items you will buy, the sale items you want to check out, and the prices. If you find the same item in another ad, note the store and price in the margin beside that item on your list for price matching. If you're using Flipp, clip the price match items. If you're not, circle the item in the printed ad so you can find it quickly when you get to the cash register. Jotting down the name of the store and price means you will locate the item quickly in the flyers and the people behind you in line will appreciate it!
5. As you go, if a recipe pops into your head using the sale ingredients, write it into one of the spots on your menu, whether it's a breakfast, lunch or dinner. Is it a quick meal for that night the kids have activities? Is it something you can make in your slow cooker? Is it something that will give you leftovers for lunch or even the next night's dinner? Is it something where you can freeze the leftovers for the next week?
6. Check the menu for gaps and fill them in using ideas from what's in your freezer or go back through the recipes on this site and see what meals match the sale items. The idea is to match your menu plan as closely as you can to what's on sale.
7. Once the menu is complete, check each recipe to make sure you actually have all the ingredients or that they are on the shopping list. This prevents last minute (expensive) purchases from the convenience store. It also means your pantry will actually have the things you think you have on hand. I can't tell you how many times I reached for something that wasn't there before I started doing that.
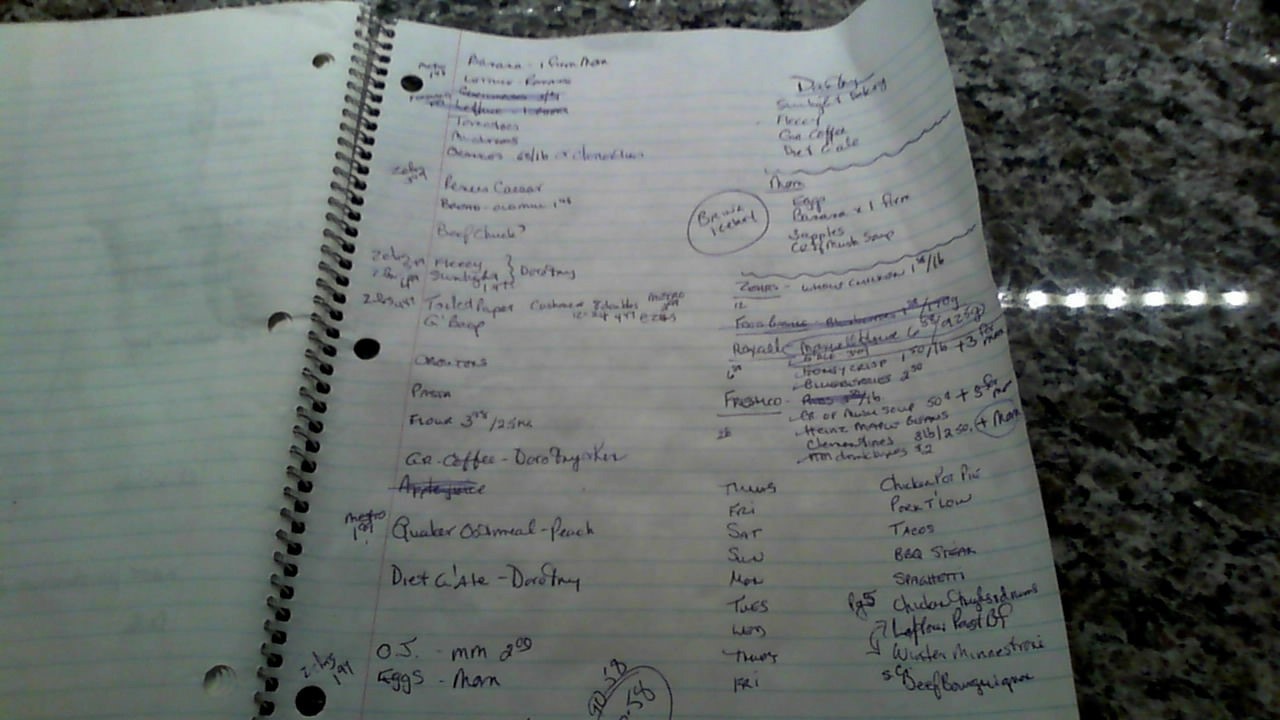
This is a bit of a mess, but here's what a typical grocery list looks like, for me. Keep in mind that I also pick up things for other people as well. I thought it might be easier to explain if you could see an actual page. See the menu in the bottom right hand corner. This menu doesn't list breakfasts or lunches because there are only two of us and I am home to make something. I don't have to pack lunches any more. Note the price matching information in the left margin beside the item (I have clipped an ad in Flipp for each of those items or circled the ad in the flyer I will take with me to the store). The stores listed above the menu are on my route and I stopped there for specific sale items. Tonight's dinner is Winter Minestrone and I soaked the navy beans before I went to bed last night. Four of the menu items are from this website. I should have written the full name of the recipe but I know what I'm making and I've checked my pantry.
8. Bring your own bags! I have a complete Hodge-lodge of fabric and plastic bags. For a while it seemed like everyone wanted to give me a bag with their logo on it. If you have a car, stuff all the bags into one and keep them in your trunk. It's so annoying to get to the store and realize the bags are still in the kitchen. Cashiers tell me that happens a lot: you save $.50 on a sale item and spend it on bags. At $.05 a bag, it can add up even if you are using them for garbage bags throughout the week. Ten bags a week for a year is $26.00!
9. If you are a couponer pull out any applicable coupons and when you get to the store, check the coupon rack. You never know what you will find.
10. Check the reduced produce and baker racks. There are good deals to be had if you're going to use them right away. Who cares if the bananas have brown spots if you're making banana bread? Who cares if the rye bread is a couple of days old if you're going to freeze it. Check the meat counters for meat that is on sale because it is a day or two away from its best before date. If you freeze it, it doesn't matter if you don't use it for another two weeks!
11. The most important items are located around the outside edges of the store. There are staples and other things you need on the inside shelves BUT that's also where the temptations/budget killers are. And, as you shop, look high and low on the shelves - the more expensive (and not necessarily better) brand names are stocked at eye-level. You have a plan in hand. Stick to it!
12. Pay attention when the cashier is scanning your groceries. Most major grocery chains voluntarily subscribe to the policy that, if an item scans differently than advertised (and there is no price sticker on the item), the item is free up to a $10 maximum.
13. Get a raincheck for any advertised item that is out of stock. They're good for 30 days usually and keep that item in mind when you're planning next week's menu. Sadly (and unfairly I think), Superstore will give you a raincheck but if the item was worth a lot of PC Plus points for that week, they won't give you those.
14. Save your points - PC, Optimum, Airmiles Cash, whatever - for those weeks when the cash flow is hurting. Save them for large ticket items. Save them for Christmas when your other expenses will be higher.
Check out these other interesting websites for good ideas for saving money on your grocery bill:
www.canadianbudgetbinder.com
www.frugalshopper.ca by Kimberly Clancy had lots of good ideas and I may have included some of them in the list above because even though I do them, I might not have thought to write them into the article.
www.mrsjanuary.com by Cassie Howard. Again, this website is great. It's designed specifically for couponing. It's huge and has an absolute ton of great general information. I may have included some of it in the list above.
www.thegreedybrain.com - the best Canadian frugal living sites in Canada - money saving ideas in all categories.
PREPARING FOR WINTER MEALS (yes, really!)
They used to call it "doing down for winter". When we were kids, canning and freezing used to be something that went on in every kitchen on the street beginning about two weeks ago. And, no, I'm not super old.... Right now, our area is coming into the most wonderful time of the year: harvest!
They used to call it "doing down for winter". When we were kids, canning and freezing used to be something that went on in every kitchen on the street beginning about two weeks ago. And, no, I'm not super old.... Right now, our area is coming into the most wonderful time of the year: harvest!
|
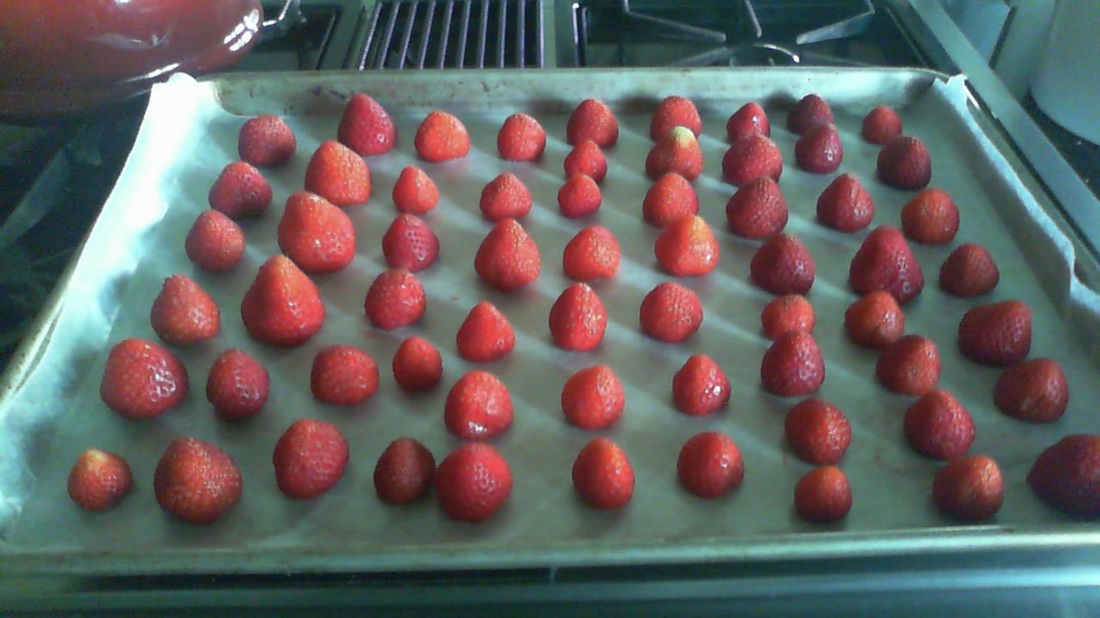
For example, the local strawberries are beautiful and not expensive. Buy a quart of berries, wash them well and let them air dry (moisture = frost). Trim off the tops and place them on a wax or parchment paper covered cookie sheet and pop them into the freezer. When they are hard, they will come right off the paper and you can put them into a freezer container and right back into the chill. In December or January, when fresh berries are not only really expensive but imported (which means they were picked under-ripe and shipped, losing flavour all the way), you can thaw out your beautiful Essex County berries, sprinkle them with a little bit of sugar to make a syrup and serve them over a Sunday morning pancake breakfast or over ice cream for a special occasion dessert. Nothing could be easier!
|
My husband called to tell me that on his way back to work he passed the Lafferty's corn wagon parked on Dougall Avenue in the Veterans Plumbing parking lot. It's not open yet but just the fact that the cart is there is so exciting!!!! We have the best corn on the cob in the world, I'm convinced. Not just from Lafferty's but from lots of other local farmers as well. Leanne Brown's cookbook has a couple of recipes that call for fresh corn and I saved them until now because I will not buy pale, imported corn when, if I'm patient, I can get beautiful, flavourful, local corn. You can freeze it too and I'm going to provide recipes and pictures for niblets for the freezer.
NIblet Corn for the freezer - July 21, 2015
Lafferty's corn is $5 for 12 cobs but they are only a S-M size. If you can find local corn for a better price by all means, buy it. I use theirs because there's a stand fairly close to my house. I found two recipes for freezing niblets so, of course, I had to do it both ways so we can taste test to see which is the best.
First, remove the husk and as much of the silk as you possibly can. Set a large pot of water to boil and when it's rolling, add a few cobs of corn and start the timer for 3 minutes. If the water takes longer than 1 minute to return to the boil, either the water wasn't hot enough or you put in too many cobs and it cooled the water too much. Put fewer cobs in for the next batch. While the corn is blanching, prepare a large bowl or a clean kitchen sink with cold water and ice cubes. When the timer goes off, remove the corn to the cold water to stop the cooking process. After a few minutes, move the cobs to a clean tea towel and let drain.
|
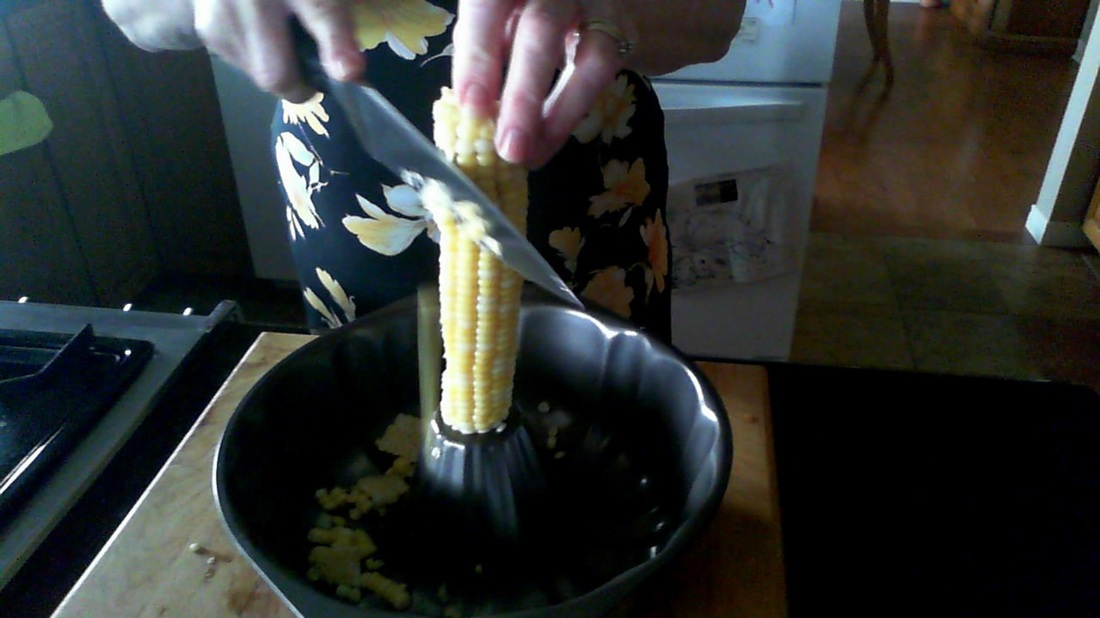
If you have an angel food or bundt pan, try cutting the kernels off the cob as in the picture. If not, just hold firmly to the cob and slice the kernels. Be careful! |

|
Rub the kernels with your fingers to separate them. Now, here's where the recipes differed. The first recipe simply says to spread the kernels on a parchment/wax paper covered cookie sheet and pop them into the freezer. Once they're frozen, scrape them off with a spatula and put them into a freezer bag or a freezer safe container. This is how I've done it in the past and I know it works.
The second recipe called for the kernels to be sprinkled with sugar. The author claims the sugar will help to protect the kernels. I used a scant 1 tbsp. of sugar for the kernels from 3 cobs. Mix them together well and follow the rest of the instructions, above. ( http://www.food.com/recipe/kittencals-method-for-sweet-freezer-corn-niblets-235011). I did 3 cobs both ways and in a week we're going to test them both to see which is better. |
TEST RESULTS: I'm sorry to say it was a tie! My husband liked the sweetened corn best and I liked the regular. I didn't see any difference in the condition of the kernels - 'protected' by sugar or not. I'm going to stick with the unsweetened recipe since we don't need the calories.
Kitchen Items
When Beatrice Fantoni from The Windsor Star interviewed me a few months ago, one of the things we talked about was what tools were important to have in a kitchen. Coincidentally, Leanne Brown just published her list and we matched on every item but one (the ceramic knife). Check out her list on Facebook at eatgoodandcheap or on her website: www.leannebrown.com
When Beatrice Fantoni from The Windsor Star interviewed me a few months ago, one of the things we talked about was what tools were important to have in a kitchen. Coincidentally, Leanne Brown just published her list and we matched on every item but one (the ceramic knife). Check out her list on Facebook at eatgoodandcheap or on her website: www.leannebrown.com
Gardening
My vegetable garden is coming to a close. When the weather cools down a bit, I will pull out the green beans and tomato plants. The cucumbers are done. The peppers are starting to turn red so in a week they'll be ready too. Everything can come out except the beets and parsnips, both of which can stay until late in the fall. You actually shouldn't pull parsnips until they've had one good frost; it makes them sweeter. I don't think that's an old wives' tale. My beets would be further along except for the damage a rabbit did just as they were sprouting. I had to fence my garden for the first time in the 24 years we've lived here!
Indoor potting soil was on sale somewhere a month or so ago. I found an old but relatively decent-looking pot in the garage and I'm going to transplant one rosemary plant, a piece of the thyme plant and possibly some of the parsley into it. There's a warm sunny spot in the kitchen by the back door and I'm going to see if I can keep them alive through the winter. Fresh herbs are so expensive in the winter and most of the time you only want a tablespoon or so! If you want to try it but don't have plants in your garden, check out the end-of-season discounted plants at any store that has a greenhouse. If they don't offer, ask if they will sell you what you want at half price. They might be willing since the plants will be a loss to them if they don't sell soon.
If your living environment doesn't offer the opportunity to have a garden, try container gardening next summer. Cherry, Golden Grape, Tiny Tim, etc. tomatoes do really well in a pot as do most herbs. All they need is a sunny spot. Maybe you have a neighbour who has a sunny backyard and would be willing to let you make a garden in his/her yard in exchange for a share of the harvest.
Once the garden is empty, I will dig two long trenches in it that are about 1 foot deep, piling the dirt along the edge of the trench. Then I will begin to save my potato, vegetable, and fruit peelings, egg shells, and any vegetable or fruit that goes bad in a container with a well-sealed lid. I just keep it in the cupboard under the kitchen sink until it's full then I dump it into the trench (all in one spot) and cover it with the dirt. The next time it's full, it is dumped into the next spot in the trench and covered. This will not bring mice or rats to your garden as long as you follow this important rule: NO MEAT! NOT EVEN SCRAPS! This past spring, when I turned over the dirt everything except for the shells of 2 brown eggs was gone - decomposed into the dirt, providing nutrients that fed this year's crop. (Oh, also no citrus. It just doesn't decompose).
Give it some thought!
STORING FRESH FRUIT AND VEGETABLES, ETC. TO GET THE MOST FROM YOUR MONEY
Check out the following articles for some very good advice about storing fresh herbs, fruit and vegetables:
How to Properly Wash Fresh Vegetables - www.ehow.com - article by Chyrene Pendleton
The Best Way to Store Fresh Herbs - www.seriouseats.com - article by J. Kenji Lopez-Alt
How to Store Fruits and Vegetables so They Last the Longest - www.gardeningchannel.com
How to Keep Berries from Getting Moldy and Gross - www.allrecipes.com - article by Vanessa Greaves
How to Keep Bananas from Turning Brown - www.phillymag.com - article by Emily Leaman
